 |
Reso-Resplendent
by
Randy Allen, Luthier
Re-printed from issue #41 Summer 2000 of Guitarmaker
Magazine
|
|
| Resophonic
guitars have been gaining in popularity in recent years.
Hardly a song goes by that I don’t hear one being played.
Resonator guitars have traditionally been made very
ruggedly, using ¼” plywood, very heavy bracing and the
like. In my ongoing building of these unique instruments,
what I have tried to accomplish in them, is to bring the
high level of acoustic guitar making to the resonator
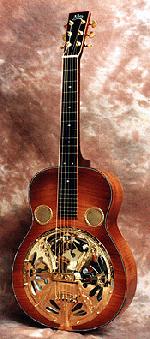
guitar. I use high-grade solid woods, fine hardware and
exotic wood bindings. Upgraded details of delicate
purflings and inlays, and elegant hand engraved hardware
makes them easy on the eyes as well! After all, once the
rough body is built, what’s left but the details! Some
of the imports I have seen and upgraded have even been
made with MDF. (Does this stand for musical
density fiberboard??) The idea of using MDF products may
have some validity if your are thinking of the resonator
guitar body as being that of a tuned port speaker cabinet!
I saw one of these once made by Hideo Tateno of the NCAL
luthiers group; you should have seen the cool sunburst
finish! I think one of the fiberboard producers should
have bought this and used it as an example of the highest
use for their MDF product line!
cont. below.......... |
 |
Basic construction designs generally fall
under two types. 1.) The traditional resonator was built with
a sound-well construction, which is basically a drum-like
structure with holes bored into it and was used for structural
reinforcement. 2.) One alternative method is sound post
construction. The structure is held up by the use of sound
posts transferring the load of the top to the back, which is
braced to resist the load. This is the method I prefer and my
customers have found them to sound very appealing.
I am using a body shape that is loosely based on a
late1920’s model instrument. I don’t use any type of
baffle system and I don’t think my instruments need it. They
tend to have very good projection and tonal qualities without
any baffle. I use high quality woods, typically flamed maple
back, sides, & top. Spruce tops offer a little more
cutting power in an acoustic situation. Myrtle, Mahogany,
Walnut & Rosewood are also available. I do build my
guitars with a fairly deep body, certainly deeper than the
depth of traditional resonator guitars. I use a bolt on neck,
which I feel has a very good mechanical contact to the body.
Another
item that I think is a great improvement over instruments of
the past is that I use machine-threaded inserts and actually
bolt the coverplate into the top. The traditional method is to
attach the coverplate with wood screws that usually strip out
over time. Many of the imports I have seen come in brand new
with stripped out screws! The extra work and expense is more
than justified by the added benefit of creating more
structural integrity where it is needed. When you make a hole
this big in a guitar it will definitely need some
strengthening! (Who knows, this instrument may have gotten
its’ start by trying to fix that screwed up sound hole
rosette purfling!)
High quality hardware is important on these instruments. Most
of the imports have very inadequate hardware. But when you
consider that the overseas factories producing these things
are probably getting less than $100 a copy to produce them; it
makes you wonder how they can do it at all! But hey, that’s
another article! American made hardware can run you between
$100 - $300 and basically consists of a spun aluminum cone,
cast aluminum spider bridge, coverplate, tailpiece and
screens. We have
been supplying mandolin tailpieces for a couple years, one in
a Monteleone design and another of my design. We have also
been working on a new cast tailpiece for the resophonic for
quite some time and should have them available very soon.
The area that the cone rests on in a
traditional Dobro is created by the sound well. In sound-post
construction it must be provided for in another way. I have
been using Baltic birch plywood to create this ledge area and
to provide a place for the sound post to be braced from. This
is one place that plywood excels From a conversation with
Gene Wooten earlier this year I may be doing some
experimenting with a new way of building the top. The idea is
along the lines of cutting up Banjos to make Resophonics. I
know, it sounds too good to be true! I’m joking of course,
actually I love the sound of banjos. (Especially going through
a band saw at a high rate of feed!)
Probably like most of you, I have been buying tools pretty
much non-stop since I began building instruments. I got
completely out of guitar making for several years and was
amazed to find I no longer needed any new tools! It seems like
from the day I started up building again, I have been back at
my old habits of steadily buying tools. I have a couple of TOOLING ideas that have proven very
fruitful that I thought I would leave you with. The first is a
large disc sander, 24” that is pretty much off the shelf. I
was in a conversation with Roy Noble when this idea sprang up!
Thanks for the inspiration Roy!
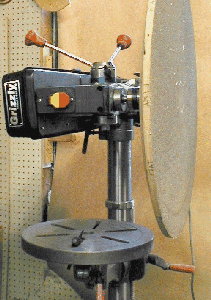
I was looking into motors to build a
hollow form sanding machine and was finding the price to be
around $180 just for a motor. I found instead, a 32” swing
radial drill press floor mount from Grizzly. ($200; less if
you get the bench model) I originally wanted this for use with
the hollow forms that Roy makes; for sanding the back of
acoustic guitars to the proper radius to mate the sides with
the backs. The tool worked so well that I thought I would make
a flat sanding disc for the resophonics. It is quite a time
saver. The disc is basically made from ¾” plywood and a
second backer of ¾” ply was added for stability.
I used a threaded bolt through the center of the disc for a
shaft; not very high tech, just quick & easy. This is one area that could probably be improved upon.
Make sure you get the chuck key good and tight. On my
first attempt I had a two-foot disc hit the floor and take off
across the shop! Sort of reminiscent of some of those great
old cartoons! I’ll have to tell you about the day the router
got away sometime! “Luthiers
have the coolest kindling!!”
Another thought is that if you have the bench mount
model mounted to the floor.
You could spin the drill press head upside down and
lower the work down onto the sanding surface, or even build an
auxiliary table around it. (I think I need to order another
one! Where’s that wife of mine anyway! And where did she
hide that credit card!...) Besides this
application, you wind up with a fairly useful 32” radial
drill press to boot!
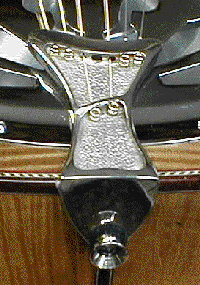 |
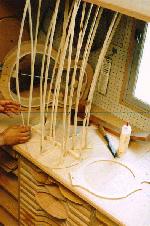
left:
Our new cast resophonic
tailpiece is finally available. This model will work
for 6,7 & 8 string instruments including mando-cello
and bouzouki. Comes in a variety of jewelry quality
finishes.
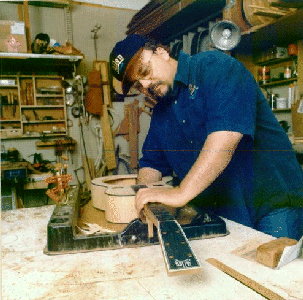
right: installing a neck on a new Allen resophonic
guitar. |
 |
The second is another inexpensive sander
I picked up. Getting the legs of a spider bridge level so that
it makes good contact with the cone is one of the more
important parts of a good set up. Sanding the legs of a spider
bridge to mate up with a cone is just one of those pain in the
but jobs! It was time consuming and a real chore trying to
keep sandpaper flat, while keeping the spider bridge flat,
while keeping everything in motion, arghhg!! You know the
drill! Anyway with this little 12” sander I just removed the
table and all the extra hardware and I can level a spider
bridge in less than 3 minutes! It is THE perfect tool for
leveling spiders!
I used to inlay a 3/8” square steel rod in the neck for
reinforcement, but also for the extra sustain it lends to the
guitar. More recently I have been using two 1/8” x 3/8”
graphite rods inlaid and glued in place with epoxy. It seems
to me to be every bit as strong as the steel, maybe even
stronger. Here is
a little un-scientific test you can try in your shop. Drop a
piece of graphite on your table saw and listen to how it
rings. Drop an identical size piece of steel stock and compare
the two. I believe that graphite has a slight edge
acoustically but judge for yourself.
Finally, if I had to limit myself to building one type of
instrument it would be the squareneck resophonic. After many
years of building, I have come to derive much joy from
building the resophonic, and I’m filled with gratitude that
my instruments have been received so well by the playing
community.
|